 by
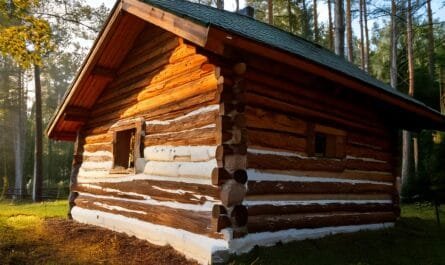
by Nestled in nature’s lap, log cabins and log homes offer rustic charm and a serene lifestyle. Maintaining the integrity and aesthetics of these log buildings largely depends on effective chinking. Chinking—filling gaps between the logs—not only ensures energy efficiency but also keeps the cabin pest-free and weather-resistant. Whether you’re working on a log house for the first time or looking to refresh an existing one, understanding how to chink a log cabin is crucial. This guide will delve into what chinking involves, why it’s a good idea, and how to apply it using the right tools and techniques.
Table of Contents
Understanding Chinking

Chinking is essential in sealing the spaces between logs in log cabins and log homes, ensuring that external elements like wind and water are kept at bay. Originally, chinking was a mixture of readily available natural materials, but modern log buildings benefit from new synthetic chinking materials that offer durability and flexibility.
What is Chinking?
Chinking involves applying a flexible sealant that adapts to log movement, providing a sturdy barrier against environmental factors. This sealant is more robust than traditional caulking and is designed to handle larger gaps. Using the right tools such as a chinking gun or grout bag, and ensuring a clean surface are the first steps to how to chink a log cabin.
Historical Perspective
In the past, materials like moss and Portland cement were used, but these offered only temporary solutions. Today’s new synthetic chinking is engineered to last a long time, replicating the look of traditional chinking while eliminating frequent maintenance needs.
Benefits of Proper Chinking
Proper methods of chinking offers numerous advantages for log cabins:
- Energy Efficiency: Seals gaps effectively, maintaining indoor temperature and reducing energy costs.
- Pest Prevention: Keeps insects and animals out, securing your home.
- Structural Integrity: Prevents moisture ingress that can lead to wood rot.
Additionally, the application process involves placing a backer rod before the chinking material, ensuring that the chink line is supported and the chink joint remains intact, even in cold weather conditions.
Materials Needed for Chinking

Selecting the right chinking material and tools is fundamental for a successful application. Here’s a list of essential materials and tools to gather before beginning to chink your log cabin.
Chinking Materials:
- New Synthetic Chinking: A flexible sealant designed for log cabins. Brands like Perma-Chink Systems offer varieties that are tailored for different climates and log styles.
- Backer Rod: Essential for supporting the chinking material in larger gaps. The backer rod helps maintain the chink line and ensures proper application depth.
- Release Agent: Used to prevent chinking from sticking to tools or areas where it’s not needed, ensuring a clean application.
Tools:
- Chinking Gun or Bulk Loading Gun: For precision application of chinking material.
- Foam Brush or Grout Bag: To evenly distribute and smooth out the chinking material.
- Gallon Buckets and Clean Water: For mixing and preparing synthetic chinking if necessary.
Choosing the Right Materials:
When selecting materials, consider the specific requirements of your log cabin or log house. Factors like log movement, weather conditions, and the size of gaps should influence your choices. Using a flexible, durable product like new synthetic chinking ensures that the material will withstand environmental changes without cracking.
Preparation Before Chinking

Proper preparation of your log cabin or log home is crucial for effective chinking. Here’s how to prepare your log buildings for the chinking process:
First Thing – Clean the Surface:
- Ensure that all log surfaces are clean and dry. Use a brush to remove any dirt, debris, or old chinking material.
- Wash the logs with clean water if necessary, but make sure there is not too much water as surfaces need to be dry before applying new chinking.
Assessing the Gaps:
- Examine the gaps between the logs to determine the appropriate size of the backer rod.
- Larger gaps may require thicker backer rods to support the chinking material adequately.
Weather and Temperature Considerations:
- Check the weather forecast. Applying chinking in cold weather or when rain is expected can adversely affect the curing process.
- New synthetic chinking generally has specifications for minimum and maximum application temperatures. Ensure that conditions are within these limits to facilitate proper adhesion and curing.
Setting Up Your Workspace:
- Organize all tools and materials for easy access.
- Pre-cut backer rod segments and stage chinking material close to the work area to streamline the workflow.
Next Step – Installation of Backer Rod:
- Insert the backer rod to fill the gap partially, allowing enough space for the chinking to adhere to the log surfaces.
- The first step in the actual chinking process involves applying a small test strip to ensure the material adheres well and achieves the desired aesthetic.
The Chinking Process

Applying chinking effectively requires precision and patience. Learn how long a batch of chinking will take to guage your time with each chinking and caulking seam. Here’s a detailed guide to applying chinking to your log cabin or log home:
Step-by-Step Guide:
- Installing the Backer Rod:
- Position the backer rod snugly within the gap to ensure a flat surface for the chinking. This is crucial for maintaining the chink line and preventing air infiltration.
- The backer rod acts as an insulating layer and helps use less chinking material, which is particularly useful when dealing with large log joints.
- Applying the Chinking Material:
- Load the chinking gun or bulk loading gun with the new synthetic chinking. If using a grout bag, fill it with the prepared chinking material.
- Start at one end of the chink joint and apply the chinking steadily, ensuring that you maintain a consistent pressure to avoid air pockets and uneven lines.
- Smoothing the Chinking:
- Use a foam brush or your fingers (wearing gloves) coated with a release agent to smooth the chinking material. This helps create a seal that is both functional and aesthetically pleasing.
- Ensure the chinking material fully contacts the log surfaces. This contact is critical to seal properly and should be checked along the entire chink line.
- Curing:
- Allow the chinking to cure as per the manufacturer’s instructions. Curing times can vary based on the chinking material used and the environmental conditions.
- Avoid applying chinking in extremely hot or cold conditions, as this can affect the curing process and the final integrity of the chink.
Video: How To Chink a Log Cabin – Handmade House TV #29
Visual Aids and Tips:
- Including diagrams or photos of each step can be immensely helpful for visual learners.
- Best Thing: Always keep a steady hand and a patient mindset, as rushing the process can lead to poor outcomes and more work later.
Maintenance and Upkeep

Once your chinking is applied, maintaining it will ensure it continues to protect and enhance your log home effectively.
Regular Inspections:
- Check the chinking at least annually for any signs of cracking, separation, or wear. Areas with high exposure to weather elements may require more frequent checks.
- Look for signs of log movement that might affect the chinking, especially in older cabins.
Repairing Chinking:
- Small cracks or issues can often be repaired without replacing the entire line of chinking. Clean the affected area thoroughly before applying new chinking material.
- For significant repairs, it may be necessary to remove sections of old chinking and replace them entirely.
Long-Term Care:
- Applying a clear stain or sealant can extend the life of the chinking by protecting it from UV rays and moisture.
- Cleaning the logs and chinking lines with a soft brush and clean water can prevent buildup of dirt and debris that may compromise the chinking’s integrity.
By following these guidelines, you can ensure that your log cabin remains beautiful, comfortable, and sturdy for a long time. Chinking not only boosts the energy efficiency of your home but also enhances its rustic aesthetic, making your log cabin a cozy haven against the elements. Good luck with your chinking project, and remember, the easiest way to success is through careful preparation and patient application!
Conclusion
Learning how to chink a log cabin is more than just a maintenance chore; it’s a critical step in preserving the charm and integrity of your cherished retreat. By understanding the role and benefits of chinking, selecting the right materials, and carefully applying them using the correct techniques, you can significantly enhance your cabin’s energy efficiency, structural stability, and overall aesthetics.
Recap of Key Points:
- Understanding Chinking: Recognize chinking as a vital barrier against environmental elements, pests, and as a promoter of energy efficiency in log homes.
- Materials Needed: Use new synthetic chinking, the appropriate backer rod, and the right application tools like a chinking gun or bulk loading gun to ensure the best results.
- Preparation: Prepare the surface by ensuring it is clean and dry, with the right environmental conditions for applying chinking.
- The Chinking Process: Follow a detailed, step-by-step approach to apply chinking effectively, using a steady hand and maintaining a clean surface throughout the process.
- Maintenance and Upkeep: Regularly inspect and maintain the chinking to ensure it continues to protect your log cabin effectively.
Final Thoughts and Tips for First-Timers On How To Chink A Log Cabin
If you’re chinking your cabin for the first time, take it slow and focus on quality over speed. It’s a good idea to practice your technique on a less visible area before tackling more prominent sections. Always ensure that you are working in suitable weather conditions, as extreme temperatures can affect the performance and durability of the chinking.
Additionally, consider reaching out to professionals or experienced friends if you encounter challenges. Learning from experienced hands can provide insights not covered in any guide, and watching the process firsthand is invaluable.
Additional Resources:
For further reading, seek out detailed manuals or tutorial videos from reputable suppliers like Perma-Chink Systems. These resources can offer more specific guidance tailored to the type of chinking material and tools you are using.
By taking the time to properly chink your log cabin, you ensure it stands strong against the elements, providing a cozy and safe environment for years to come. Whether you’re preserving an old cabin or sealing a new one, remember that the effort you put into this process is an investment in the longevity and quality of your home. Good luck, and may your log cabin continue to be a source of pride and joy!
This comprehensive guide should effectively cover all aspects of the chinking process from start to finish, providing valuable insights for both novices and seasoned cabin owners alike.